Understanding the Verse List Bar Graph

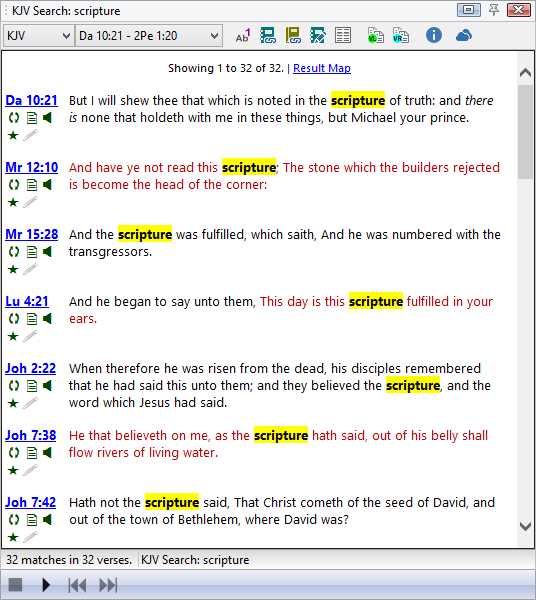
When you do a Bible search, the results are displayed in a Verse List panel. At the top of the panel is a Match Frequency Bar Graph that helps you quickly survey the use of the words over the whole Bible.

Match Frequency Bar Graph

Using this graph you can instantly see where the most and fewest verses are, as well as quickly navigate in the search results.

  • The bars are color-coded for sections of the Bible (Law, Gospels, etc).
  • Hold the mouse pointer over a bar to see the book name and how many verses matched in that book.
  • Click to instantly scroll to the first match from the book.

Just experiment! In no time you’ll see how fast and helpful the bar graph is.

And here are some pro tips:

  • The toolbar in the verse list panel has a toggle button for the bar graph:
Bar graph toggle button
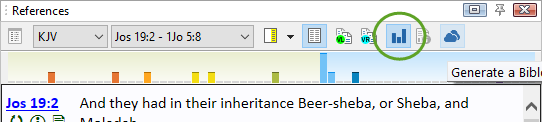
  • By default, Bible search results show the bar graph, but you can hide it by clicking the toggle button.
  • Other types of verse lists don’t show the bar graph by default. But any verse list actually can display a bar graph, even KJV-TSK reference lists. Just click the toggle button to make it appear.
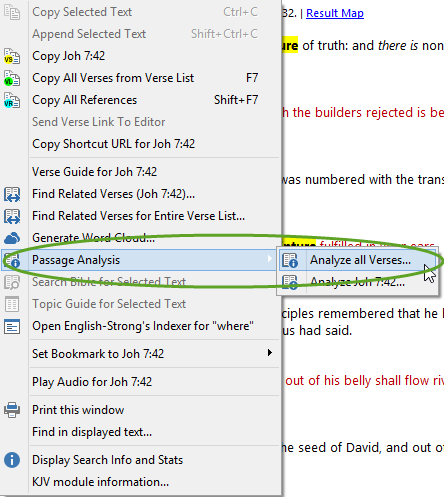
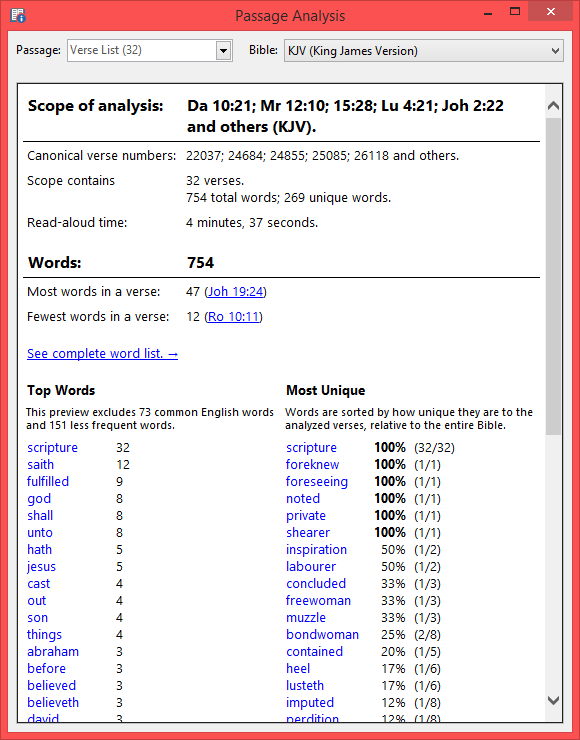
  • There are even more graphs you can view. Click the Info and Search Statistics button 2017-04-28_13-16-49 on the toolbar for more!
  • If you decide you don’t like seeing the bar graph by default, you can turn it off in preferences. Go to File, Preferences and Settings, Bible and Verse Panels, Verse List Defaults. It’s the setting called Show Bar Graph.

Not seeing the bar graph? It was added in version 8. Please see the upgrade FAQ to learn about upgrading SwordSearcher.

Quick tip: Switch to Concordance View in search results

SwordSearcher 8 has two view modes for Bible search results. The default mode, called full view, shows complete verses with search results highlighted. This is usually exactly what you want, but there is another way of viewing search results that you may want to use on occasion, called Concordance View.

Concordance View screen shot
Verse List showing Bible search results in Concordance View mode.

To switch to Concordance View, just click the Concordance View toggle button in the toolbar.

The layout of Concordance View is similar to a printed Bible concordance, with each match from the search shown on a single line.

Although the normal Full View mode shows more, Concordance View has some advantages:

  • It is easier to locate a single verse out of a large set of results, if you think you will recognize it just by its placement in the verse.
  • All matches are shown in a single page.
  • Each match in a verse is shown on its own line (see the asterisk lines in the above picture).
  • Complex search results with overlapping matches can be easier to understand in Concordance View.

Holding the mouse pointer over a line will present a pop-up preview of the entire verse. Clicking the line will open the verse in the Bible panel. Concordance View has mostly the same options on the right-click pop-up menu as Full View mode.

Verse Widgets are visible in Concordance View. If you would like to turn them off to have more space for the search results, you can do so in File, Preferences under Verse List Defaults.

Analyzing verses from a Bible search

Here’s a somewhat obscure but interesting and often useful feature of SwordSearcher.

The Passage Analysis feature (added in version 7.1) gives you lots of details about sections of the Bible, such as a book or group of books. (See this detailed video for details.) Information includes a full list of words ranked by frequency of “uniqueness” to the passage, word count, versification metrics (number of chapters, most verses in a chapter, most words in a verse, etc), and more. The Passage Analysis tool is normally opened from the Search menu.

However, what’s not obvious is that the Passage Analysis tool can also be invoked based on a verse list. This option means that you can analyze verses from a search result. (In fact, you can do this with any verse list, including ones loaded from the Scan Text for Verse References tool or from Book and Commentary Panels.)

For example, do a search for the word scripture, and you will get a verse list result like this:

Search results for a Bible search

To “analyze” just the verses from this search, right-click in the verse list panel and select “Analyze All Verses” from the “Passage Analysis” menu item:

Right-click menu for verse list, Passage Analysis, Analyze all Verses.

This will open the Passage Analysis tool and analyze all of the verses from the search results. This is what it looks like:

Passage Analysis of all verses in the Bible with the word "Scripture"
Passage Analysis of all verses in the Bible with the word “Scripture”

This can be quite interesting. For example, take a look at the “Most Unique” ranked word list. Scripture is the first word in the list, because that’s the word we searched for, so every verse in the Bible appears here. But right below that we can see that the words foreknew, foreseeing, noted, and private only appear in verses that also have the word Scripture. Now this may or may not carry some significance, but the only way to find out is to start studying.

Again, be sure to watch the video demonstrating the use of the Passage Analysis tool to see if this could be useful with any of your own Bible search results!