The real power of SwordSearcher's reading schedule system is the ability to design custom reading plans. If you want to go through the Gospels in two weeks, or read the Psalms in a month, it's easy to set up a reading schedule to do just that. You can create as many custom plans as you want.
On the Devotional menu, select Add a New Reading Plan to the Schedule.

Step 1 of designing a custom reading plan
To get started, choose Design a Custom Plan and then click Next.
Time

Step 2 of designing a custom reading plan
The next step is to decide how the duration of the plan will be determined.
Option 1: Daily time allotment. You can base the plan on how much time you want to spend on it each day. From an easy 5 minutes per day to an ambitious 2 hours per day, the readings will be divided to give you a fairly consistent daily reading time. Rather than just "chopping up" the readings by verse count, SwordSearcher will base the daily portions mainly on how long they will take to read. This type of plan favors consistent daily reading times, but still tries to begin and stop daily readings at logical points in the text.
Option 2: Calendar days. This option bases the plan on a fixed calendar period. For example, you may wish to read through the whole Bible in three months, or the Pauline Epistles in one month. Use the date selectors to help you choose the number of days, or, use the Preset Length menu to automatically choose from a list of predefined plan lengths (one week, one month, etc.) If you have a specific ending date in mind for your reading plan (e.g., "I want to read the book of Acts by Friday"), you can use the date selectors to specify the required length of time.
The actual scheduling of your reading plan (where you choose exactly when to start the plan) will come in the final step. For now, you are just designing a plan that can be re-used any time you want, and the first/last days shown in this step are just examples.
About daily reading division: SwordSearcher doesn't just chop up reading plans by verse count. SwordSearcher's reading plan system intelligently uses the time required to read each verse and chapter to create a more consistent daily reading plan, and when possible, starts daily readings at logical positions in the text instead of merely dividing by verse count.
Once you make your choice, click Next. Don't worry. You can always use the Back button to come back to the step if you change your mind before you're finished making the plan.
Scripture

Step 3 of designing a custom reading plan
The next step is to assign scripture segments to the plan. Type a range of verses (usually books, like Mat-Joh) and then click Add to Plan to add it to the list of assigned reading segments.
Here is a simple example. If you want to read through the Gospels in one month, you would assign a single reading segment like this:

Leave the reading count set to "read once", then click "Add to Plan."
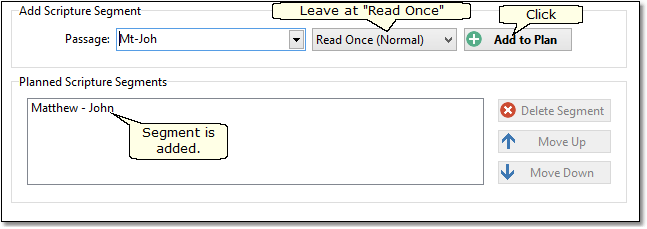
At this point the plan could be complete and you would click Next. But what if you want more in the plan?
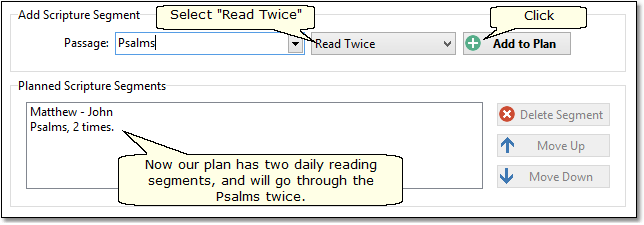
A scripture segment is a range of verses from which you want to read every day. For example, a plan that reads through the entire Bible once in book order has a single scripture segment: Genesis through Revelation. If you want to read from multiple segments on each day, you would assign two or more segments. For example, you can create a plan that goes through Psalms and the Gospels, reading from Psalms every day and the Gospels every day, by assigning two segments. In the above example, we already have the Gospels in our plan, so we can just add Psalms.
Also, let's say that by the end of the month we want to read through the Psalms twice. Meaning, we want to read through the Gospels in a month, and Psalms twice in a month, from both each day. To do that, we add a segment for Psalms and use "Read Twice" instead of Read Once.
(Again, just type the name of the book in the Passage box, or use the drop-down menu to add it without typing.)
Tip: Remember, reading segments are used to specify portions of Scripture that you want to read from every day. Don't add books as separate segments unless you want to read from them every day. To specify a range or groups of books to read through in order you just need to use a single reading segment with those books. For example, you can read Acts, Ephesians, and Jude by adding a single reading segment with the passage "Acts; Ephesians; Jude".
Lets continue with our above example. We have specified that we want to read through the Gospels (Mt-Joh) every day, and the Psalms every day. By the time the plan is completed we will have read through the Gospels once and the Psalms twice.
Click Next.
Preview
Assuming we chose one month for our plan duration, we should see a preview like this:

Step 4 of designing a custom plan: the preview.
As we can see, our plan will take 30 days and average 32 minutes of reading each day. The plan preview shows you exactly how the plan is divided over the days. With a plan like this one, with plenty of reading material each day, the division of the plan strongly favors chapter positions and never stops in the middle of a paragraph.
If you aren't satisfied with the plan, you can use the Back button to make changes to the reading segments or the duration of the plan. Experiment until you are happy with the results.
Click Next.
Schedule and Save

Step 5 of designing a custom reading plan
Now you're ready to give the plan a title and schedule it. In the above example we're using the title "Gospel and Psalms in a Month," and the plan will start on March 4th, 2014. We can see that the last day of the plan will be April 2nd. You can choose one or the other: a beginning or ending day of the plan.
When you're happy with the schedule and title, click Save.
Done!
Now that our plan is scheduled, we can start reading the first day, which looks like this in the Reading Schedule:

Sample Reading Schedule Window