The Bible panel is where you will do most of your Bible reading. This is where SwordSearcher displays Bible text, as well as (optionally) links to related material.
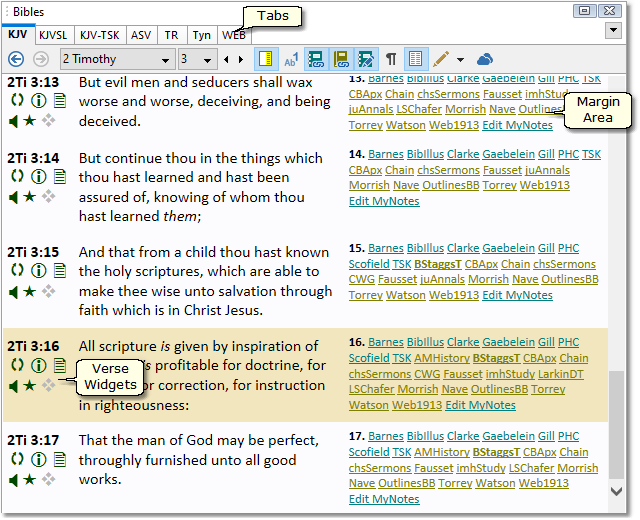
Sample Bible panel
The tabs in the Bible panel switch between Bible texts. The tabs have abbreviations for Bible texts (e.g. 'KJV' for the King James Version), and holding your mouse pointer over a tab for a moment will display the full title of the Bible text. (Another way to access Bible texts is from the main menu under Bible > Select Bible.) You can control which tabs are visible for your library items; see Managing Library Tabs.
The Bible panel's margin area includes footnotes for the Bible text and links to material related to the verse. In addition to controlling what type of links are shown with the toggles described below, you can use the Margin Links section in Preferences to specify which library items should be included in the margin area. (You can also use a Module Set to control which items are included in the margin area.)
Verse Widgets appear under each verse reference in the Bible panel, giving one-click access to various verse-related functions and to your favorite commentaries. See configuring Verse Widgets for more information.
If you have configured audio Bible support, familiar audio controls are shown at the bottom of the Bible panel, and can be used to play your active audio Bible synchronized with the verse text:

Sample audio control bar, which appears if Bible audio support has been configured (optional).
The Bible panel has its own toolbar for quick access to various features specific to the Bible panel.

Sample Bible panel toolbar
Back/Forward: Go back to a previous passage you were viewing as well as return. Right-click the forward or back buttons for a history list.
Book and Chapter Selection: This is one way to select a book and chapter to view. You can also use the Go To Verse toolbar to type in a verse reference.
Previous/Next Chapter: You can quickly move back or forward by one chapter with these buttons.
Margin Area Display Toggle: When selected, the margin area will be displayed in the Bible text area, depending on which items you have selected (commentary links, book links, footnotes, and edit links; see following). You can also right-click this button to configure which items are included in the margin area.
Footnotes Display Toggle: When selected, footnotes for Bible text (if available) will be included in the margin area.
Commentary Links Toggle: When selected, links to commentary text on the verse (if available) will be displayed in the margin area.
Book Links Toggle: When selected, links to Book and Dictionary entries that reference the verse will be displayed in the margin area.
Edit User Commentary Links Toggle: When selected, and a user commentary has been created, links to edit the commentary on that verse will be displayed in the margin area.
Paragraph Mode Toggle: When selected, Bible text will be formatted in paragraph style. Note: When paragraph mode is selected, the margin area is not displayed.
Compare Mode Toggle: When selected, a second column of Bible text is shown for the selected compare version. Right-click the compare mode toggle button to select the compare version. Note: the compare column is not shown if the currently selected Bible version tab is the same as the specified compare version.
Highlighting and Underlining: Apply markup (colored highlighting and/or underlining) to text you have selected with the mouse, or to clear markup you have applied.
Bible Word Cloud Generator: Opens the Bible Word Cloud Generator, set to the current chapter.
Quick Topical Lookup:
Double-clicking a word in the Bible panel will attempt to look up that word in the Topic Guide. You can customize or disable this behavior to your liking in the Sync Options.
You can also use the Webster's 1828 Dictionary lookup feature on the pop-up menu, shown below. (Requires Deluxe version.)
StudyClick:
Hold down the CTRL key as you move the mouse pointer over words to turn them into links for instant StudyClick actions. See StudyClick.
The Bible Panel Pop-up Menu
Right-click a verse in the Bible panel to activate the Bible panel pop-up menu.
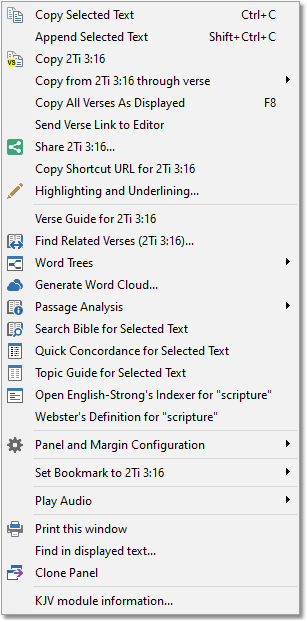
Sample Bible panel pop-up menu
Most of these functions are self-explanatory. Notice also that several of these functions have short-cut keys associated with them. Several pop-up menu features simply duplicate functions found on the toolbars or main menu. A few details will be beneficial:
Whenever a function refers to Selected Text, it is referring to any text you might have marked with your mouse in the Bible panel before right-clicking. If you have not selected any text with your mouse, these functions will not apply.
Copy 2Ti 3:16: When you right-click on a verse, this option will reflect the verse you click on. This function quickly copies the verse to the clipboard according to your Export Formatting options. Using this function alleviates the need for manually selecting the text of the verse to copy and allows you to decide how you want the text copied via the Export Formatting options.
Copy 2Ti 3:16 through verse >: Like the above function, this reflects the verse you clicked on. This function differs from the previous in that it allows you to select a verse to copy through (a range of verses in the chapter rather than just one verse).
Share... invokes the Windows 10 share functionality for the verse, using your Export Formatting Options. (Windows 10 only.)
Open English-Strong's Indexer for... Whenever you right-click a word in the Bible display that exists in the KJV, you can use this function to open the English-Strong's Indexer (an analytical concordance tool) for that word automatically. For more information, see Using the English-Strong's Indexer.
Webster's Definition for... If you have the Webster's 1828 Dictionary module installed, and the word you right-clicked on appears in it, this item will quickly load that definition in the Book and Dictionary panel.
Panel and Margin Configuration contains the same toggle options from the Bible panel toolbar and shortcuts to configuring verse widgets.
Clone Panel creates a new panel with a copy of the current content. See Clone Panels for more information.
Setting a Compare Version
You can compare two Bible versions by setting a compare version. Right-click the compare mode toggle button to select a comparison text. Left-clicking the toggle will switch on or off the comparison column. You can also right-click one of the Bible tabs and select the "Show as compare version" item.
The compare version will be displayed to the right of your primary version. (The tab you have selected for the Bible text is your primary version.) Note that you may select the same version for compare and primary, but when you do so, you will only see a single Bible column. The reason for this is that when you change your primary version, the compare version stays the same. For example, if you select KJV as your compare version, then whenever you select a different primary version, the KJV text will display to the right of it.
Below is an example of a Bible panel with the primary version set to the Textus Receptus and the compare version set to the King James Version.
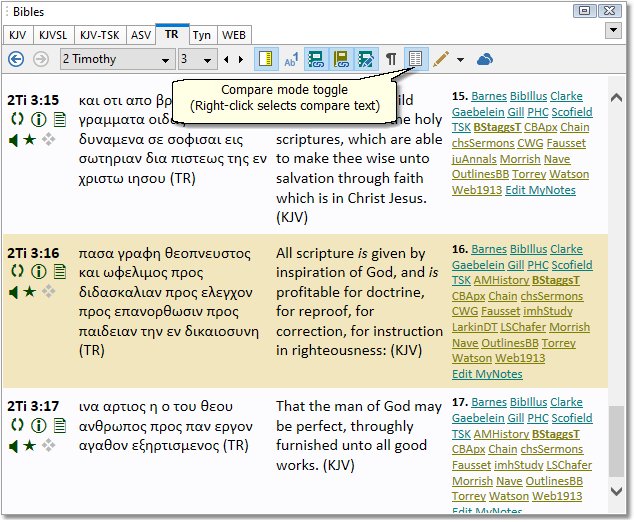
Sample Bible panel showing compare mode
Highlighting and Underlining
You can personalize Bible text in the Bible panel with user markup (highlighting and underlining). Select words with the mouse by clicking and dragging over the words. Use the Highlighting and Underlining button on the toolbar to apply markup:
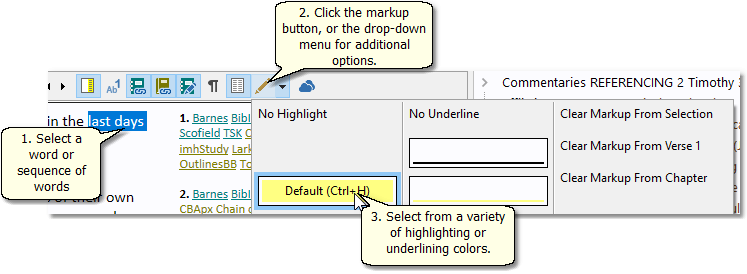
Sample showing markup actions
The main Bible menu contains functions for managing user markup:
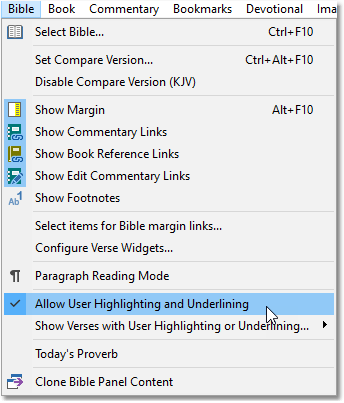
Sample Bible menu
Disable Allow User Highlighting and Underlining if you have no need for user markup and want to disable the highlighting and underlining features of the Bible panel.
Show Verses with User Highlighting or Underlining shows you all the verses you have applied markup to, and also provides an easy way to quickly remove highlighting from a group of verses or the entire Bible text.
After selecting text with the mouse, you can press Ctrl+H to apply highlighting using the most recent color or underline you have used.
New Testament-only Bible texts
Some Bible texts in SwordSearcher are only New Testament texts. If you are reading or comparing an Old Testament passage and have one of these modules selected, no text for the verses will be shown because none is available.
KJV-TSK (Cross-references)
For integrated, in-line cross-references, see the KJV-TSK Bible tab.
King James Version with Strong's Links
A special Bible text in SwordSearcher is the KJVSL, or King James Version with Strong's Links. For an explanation of what the KJVSL is and the features it adds to the Bible panel, see Using the King James Version with Strong's Links.